The SharePoint Connector module is distributed as a Sitecore package.
The module installs its components into the following folders:
-
/Sitecore modules/Shell/SharePoint Connector
- /bin
After the package installation, you should make the following changes in the web.config file:
1. Dataproviders Section
Add the lines below to the <dataproviders> section:
      <sharepointstructure type="Sitecore.Modules.SharePoint.Providers.StructureProvider, Sitecore.Modules.SharePoint" />
      <sharepointlists type="Sitecore.Modules.SharePoint.Providers.ListProvider, Sitecore.Modules.SharePoint" />
      <sharepointmedia type="Sitecore.Modules.SharePoint.Providers.MediaProvider, Sitecore.Modules.SharePoint" />
This will enable the building of Sitecore content based on SharePoint web services.
2. Databases Section
Add the lines below to the <databases> section:
      <database id="sharepoint" singleInstance="true" type="Sitecore.Data.Database, Sitecore.Kernel">
        <param desc="name">$(id)</param>
        <dataProviders hint="list:AddDataProvider">
          <dataProvider ref="dataProviders/sharepointstructure" param1="$(id)"/>
          <dataProvider ref="dataProviders/sharepointlists" param1="$(id)"/>
          <dataProvider ref="dataProviders/sharepointmedia" param1="$(id)"/>
          <dataProvider ref="dataProviders/main" param1="master"/>
        </dataProviders>
        <securityEnabled>false</securityEnabled>
      </database>
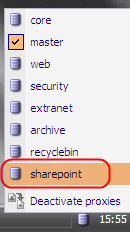
This will group the content from the SharePoint Portal site in a new database. Click the database icon in the bottom right corner of the desktop to see the new database:
3. ui - references section
Add the line below to the <ui><references> section:
<reference>/bin/Sitecore.Modules.SharePoint.dll</reference>
This will activate the sheer UI forms which maintain the SharePoint Connector functionality.
4. hooks section (Sitecore 5.3 only)
...
<hook type="Sitecore.Modules.SharePoint.Hook, Sitecore.Modules.SharePoint" />
...
</hooks>
5. processors - uiUpload (Sitecore 5.2 only)
Note: the instructions in this section are valid for Sitecore 5.2.x.
Add the line below to the <processors> <uiUpload> section to activate the upload handling in the media library.
Important Note: You should insert this line exactly as shown below, as long as the order of the processors matters.
<uiUpload>
<processor mode="on" type="Sitecore.Pipelines.Upload.ResolveFolder, Sitecore.Kernel" />
<!-- INSERT THIS LINE -->
<processor mode="on" type="Sitecore.Modules.SharePoint.Pipelines.Upload, Sitecore.Modules.SharePoint" />
<!-- /INSERT -->
<processor mode="on" type="Sitecore.Pipelines.Upload.Save, Sitecore.Kernel" />
<processor mode="on" type="Sitecore.Pipelines.Upload.Unzip, Sitecore.Kernel" />
<processor mode="on" type="Sitecore.Pipelines.Upload.Done, Sitecore.Kernel" />
</uiUpload>
6. controlSources Section
Add the lines below to the <controlSources> section to let Sitecore know the location of the xml controls:
<source mode="on" namespace="Sitecore.Modules.SharePoint" assembly="Sitecore.Modules.SharePoint" prefix="sharepoint"/>
<source mode="on" namespace="Sitecore.Web.UI.XmlControls" folder="/sitecore modules/shell/SharePoint Connector/UI" deep="true"/>
7. Events Section (Sitecore 5.3)
Insert the line indicated below to register the appropriate event handler (applies to Sitecore 5.3).
    <events>
      <!-- ... -->
      <event name="item:deleted">
        <handler type="Sitecore.Links.ItemEventHandler, Sitecore.Kernel" method="OnItemDeleted" />
        <handler type="Sitecore.Tasks.ItemEventHandler, Sitecore.Kernel" method="OnItemDeleted" />
        <handler type="Sitecore.Globalization.ItemEventHandler, Sitecore.Kernel" method="OnItemDeleted" />
        <!-- INSERT THE LINE BELOW -->
        <handler type="Sitecore.Modules.SharePoint.EventHandlers.DeleteConnectionHandler, Sitecore.Modules.SharePoint" method="OnItemDeleted" />
        <!-- /INSERT -->
      </event>
      <!-- ... -->
    </events>
8. Enabling Document Upload to the SharePoint Installation
The SharePoint module provides upload features only for Image Libraries. However, it is possible to develop a web service which will handle uploading to Document Libraries as well. This installation of the web service must be performed on all the SharePoint servers that you wish to be able to upload documents to using Sitecore’s Media Library.
You will find the UploadService.zip file in the /sitecore modules/shell/sharepoint connector folder. Extract the archive and copy the files to the SharePoint Server – typically, to the following location:
C:\Program Files\Common Files\Microsoft Shared\web server extensions\60\ISAPI.
9. Specifying Log File Location
You need to specify the location of the log files by adding (or modifying) the following setting in the <settings> section of the web.config file:
<setting name="SharePoint.LogFilePath" value="c:\logfiles\" />
The path can be either relative to the Sitecore installation root folder or absolute and must end with a slash “/” or “\”.
10. Proxy for Master database
Please check that proxy is enabled for Master database in web.config:
<!-- master -->
...
<proxiesEnabled>true</proxiesEnabled>
11. Upgrade Instructions
Upgrading from Share Point Connector 2.1.1 to Share Point Connector 2.1.1 rev. 080624
Install the module and choose “Overwrite” for Sitecore.Modules.SharePoint.dll and “Skip” for everything else.
Upgrading from SharePoint Connector v2.0.x to SharePoint Connector v2.0.3 (Sitecore 5.1)
Install the upgrade package supplied with the module (Sharepoint connector patch v.2.0.3-SC5.1.zip) over existing 2.0.x installation. Choose Overwrite All option when prompted.
Upgrading from SharePoint Connector v2.0.x to SharePoint Connector v2.0.2
Install the upgrade package (sharepoint connector patch 2.0.2.zip) supplied with the module over existing 2.0.x installation. Choose Overwrite All option when prompted.
Upgrading from SharePoint Connector v2.0 to SharePoint Connector v2.0.1
Install the upgrade package (sharepoint connector patch 2.0.1.zip) supplied with the module over existing 2.0 installation. Choose Overwrite All option when prompted.
Upgrading from SharePoint Connector v2.1.0 to SharePoint Connector v2.1.1
Reinstall the module, choose 'overwrite all' for the files and ‘Merge/Merge’ for the content items when asked.
Change <database> definition in web.config according to the installation guide or README, delete sharepoint entry from the <uiUpload> section.